To do as one of my 365
http://www.digital-photography-school.com/an-introduction-to-smoke-photography
Setup picture here:
http://www.anrbphotography.com/2010/01/16/recipe-smoke-photography/
Tuesday, July 12, 2011
Paint Sculptures
Gotta do this for one of my 365
http://www.digital-photography-school.com/paint-sculpture-tutorial
http://www.digital-photography-school.com/paint-sculpture-tutorial
Thursday, June 9, 2011
Thursday, May 19, 2011
Photoshop links
http://www.flickr.com/groups/photoshopsupport/discuss/72157622578588121/
I love this bluish toning look. Search for cross-processing techniques.
Lomo effect :http://www.digital-photography-school.com/how-to-make-digital-photos-look-like-lomo-photography
41 Photoshop tutorials http://www.hongkiat.com/blog/41-nicest-photoshop-photo-effects-photoshop-tutorials/
Flickr URL
I just figured out that I can't change my flickr URL address. Grrr. I want to name it to match my username CaramelCho, but too late,it has became a fixed URL now unless I open a new account.
http://www.flickr.com/photos/chomonkyaw/
http://www.flickr.com/photos/chomonkyaw/
Sunday, May 15, 2011
inspired
Quite inspired by Penny after watching 3 days of live course at Creative Live. It definitely took my life and soul and my weekend away. Feel restless. I've been watching live from start to finish for 3 days straight.
But it's worth it. I've learned alot. I'm quite inspired that I get out of bed to cook and taking food pictures in the kitchen while watching penny. My whole weekend, my entire world is photos. I'm inspired and photo-oriented morning to night and want to take pics.
I want to go out there and start taking pics of food trucks or construction workers or whatever people are doing out there.
I have a picture set in mind for Dave's next July 4th party, titled "Americans' July 4th". It's definitely "Food and culture". I'll make a project set out of it. It needs to tell the full story. I'll make it a project rather than getting good pictures from the event of the day. I'll keep the project in mind to tell the complete story rather than snapping few good pics.
I will start assigning self-projects and make complete sets of each project. I need to be project-oriented. Projects tell a story that individual pics don't.
So, my starter projects:
- Dave's July 4th party
- food truck at stanford
- whatever party I go
- ???
Tuesday, May 10, 2011
Focus for self-portrait
http://photodoto.com/im-ready-for-my-closeup-6-methods-for-perfectly-focused-self-portraits/
I should do string method + reverse focusing.
Wednesday, April 27, 2011
Monday, March 14, 2011
Flash bus tour
I had lighting class whole day on Sunday. Painful to get up early after soaring snowbard yesterday.
But at the end of the class at the end of the day, I learned alot about what/how other people do. They didn't teach the basics, but I got the idea of how pros shoot/think/tweak. A lot of TTL by McNally, and he is mainly tweaking flash exposure bias of each slave flash from the master attached to his camera. He usually fixed it at 1/250 and f5.6.
David Hobby did lighting in layers, adding one strobe at a time and see what else needs to be added and where.
Saturday, March 12, 2011
Let it rake
1/32 M set
~3' away
~10 deg tilted from the subject
a little bit elevated than subject (otherwise, it only lights the side of the object and the light doesn't RAKE across the whole surface), and also it is too harsh on the side because all the light hit the side and reflect. So it needs to be a bit higher. ~2" , then tilt it up a tiny bit so that the bottom-most ray barely go over the side edge. That way it doesn't flash the side out and lost all the details on the side.
Note: side of the object = side facing the flash.
1/250 as always
1/5.6 (some guesstimate from previous imaginary light meter collection)
Gotta play around with the height of flash, tilt, distance and power. Too many variables!
It took me ~10 shots to get what I want. I picked one setting that I thought will work. Looked at the pic and figured what's wrong and what I need to adjust, and repeat.
Sounds like I semi- tweaking? Any smarter way without trial and readjust things?
Tuesday, March 8, 2011
Lighting 102 Specular light test

80mm zoom with snoot
1/64 for all except the last few ones as noted.
Flash slightly above on camera right

28mm zoom with snoot
darker
But catch light is ~same size because snoot is same

28mm without snoot
catchlight is dimmer now because light is not concentrated as before by the snoot
1/64

Moved flash to the side.
Trying to see if I can get total "external" reflection without transmission thru the glass (i.e: no see through). I didn't get it. I tried angling to make light just hit the surface and bounce off the glass. Seems like I need smaller acute angle of flash to glass.
80mm zoom with snoot

Flash bounced off the ceiling.
80mm zoom with snoot
1/2 power seem 1/64 for others is too weak to bounce off the ceiling and come back.
Catch light is bigger and weaker now that it's not quite noticeable. Bounce off flash is s a bigger light source now.
After this, I don't know what I'm supposed to get and forgot the goal. Gotta read strobist lesson again.
Friday, February 18, 2011
Day_48_DoubleHearts

Or triple...
Can you guess what book this is?
I tried to shape the light by using snoot with very small opening aimed at the setup very close ~4" away so that the light is focused. The more focused the flash is the easier to shape it around the heart.
1/250 sec, 1/8
1/32 M. 1/64 is too dark. I could open up the aperture or I did? Forgot. BAsically I tweaked around f/stop and 1/32 and 1/64. Bad habit. Gotta learn more.
Wednesday, February 9, 2011
Slow Sync Flash
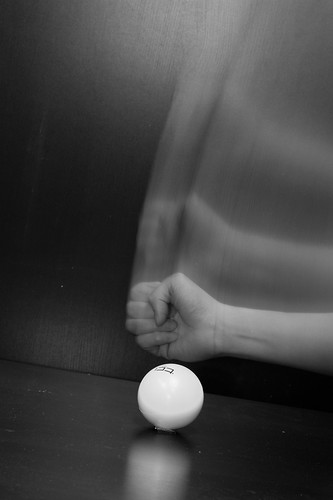
- choose a dark background. I've been taking ~50 shots with different f/ and speed and flash power settings in the kitchen with light cabinet background and the hand just doesn't show up. Turned out hand color is same as cabinet and ghostly movement just get lost in the cabinet color background. Once I switched to black background, boom! same setting in the kitchen shows the


movement now. It's about background. Just like my smoke lesson.

- Manually expose (without flash) for a little darker than 0 exposure (-1 or -2). If it's too dark, the movement is not seen (just like noodle smoke lesson). If you can't see the movement by eye without flash, you won't see it at all. So expose for some normal exposure. 0 is fine too depends on how much the hand can be seen.
- Speed! I've been trying 5 sec, 4 sec, 3 sec , 2 sec. Shorter has more precise movement. Just hit the object and the trajectory is more natural looking. ~2 sec is perfect. Now with 4 secs, movement path is wiggly. And focusing on the hand is tough unless it's very quick. Don't rest the hand at the e
nd because it'll be shaking unless it's very quick. I hold my breath so that the hand at the end will appear sharp. no. It's very hard to be still for the last 1 sec. Btw, counting in 1 Mississippi works perfect for timing.
- My mistake is using squishy ball. It bounces back so the ball just showed up blurry, so later pics, I dont touch the ball anymore to have it sharp in the pic. (too bad I aldy deleted them too fast. Could have shown it here of how bad the squishy ball looks because of its squishness). Well, even if I smash a glass, it'l be blurry too unless it's quick enough. Because most of the time of a perfect glass is exposed most of the time during 4 sec, so the broken glasses will be mixed with perfect glass. So, if you want something pure sharp, don't ruin its shape at all during shutter open time.
For next time:
- off-camera flash -> set 2nd curtain sync on flash by >>> arrows
- Set a better background. See inspirations
- again snoot. My snoot doesn't seem to work as desired. This time I didn't learn much from the flash. It was just trial and error.
- plan , plan , plan!
Using snoot

 f/1.8 for both
flash ~ 2 ft away on M 1/64
Left is with Al foil snoot. Right is w/o snoot
With snoot, the pic is darker with the same f/1.8. Even the subject itself is not as bright as without snoot. Background is as expected, but subject is less dark with snoot. Am I missing something? Is my Al snoot doing something wrong?

With this shot yesterday, I can see the snoot opening pattern on the box. The big spread seemed to be the bounced light escaping from the sides of the AL foil before it reaches the end. THe light is escaping! Well, it's not fiber optics, but I thought it should bounce internally better than this. Time to read Strobist.
With this shot yesterday, I can see the snoot opening pattern on the box. The big spread seemed to be the bounced light escaping from the sides of the AL foil before it reaches the end. THe light is escaping! Well, it's not fiber optics, but I thought it should bounce internally better than this. Time to read Strobist.
Monday, February 7, 2011
How to take smoke pictures
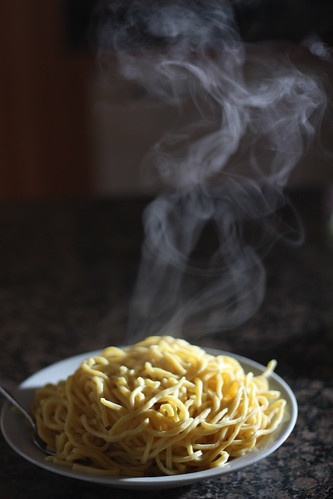
I'm not over the smokes yet until I get it right. You will see more smoke pics in future. This smoke/steam from noodle is short-lived as in dry ice. I need more sustainable smoke.
1/64 M ~1ft away. f/1.8, 1/250 - Need dark background. If I can't see smoke with bare eyes, I can't see it in pics.
- Focus is hard. I wish this has better focus.
- Best solution for next time: Put the food in window light and expose for that natural light (w/o considering flash exposure) so that the food will look appetizing in natural light. For the smoke, put the food against black background (dark cabinets), so basically put the food between the window and the dark wall.
- Without flash, the food should look appetizing. Wil not see the steam well.
- Now Aim the flash at smoke. The flash will expose the smoke.
- I need snoots so that it doesn't spread to the food to interfere with natural light on the food.
** I should start using snoots
The pic on the right has the right idea, but the background needs to be dark.
Tuesday, February 1, 2011
flash zoom focus
 1/250
1/250-f/13 for all
- 1/64 M
- ~1ft above subject
24mm is very broad, 108mm sends a narrow beam to reach 108mm focal length, so the mushrooms has brighter/hasher light hitting their head. 24mm light is so broad that their heads are not lit enough.
Notice the beam spread at the top of each image. 108mm image has the dark corners (means narrow beam coming out) and 24mm has almost uniform light at corners.
'
My fav is 108mm out of these 3 pics. The others are too dark. Flash is "in-focus" for 108mm and "not-in-focus" for 24mm.
I don't think this is how 'Apparent light source' exercise is to be done; it needs to be bounced off the wall to create a bigger+softer light source with 24mm and smaller+hasher light source with 108mm. But this is how I ended up. I need to plan next time before clicking.
I had so much fun with this shot. First time mounting flash on Gorillapod overhead. Gorillapod is gripping on the lamp. Scary. But it works! And my first time having flash overhead. Gorillapod is so worth it now. I've made good uses of it recently.
Day_29_Apple_reflection
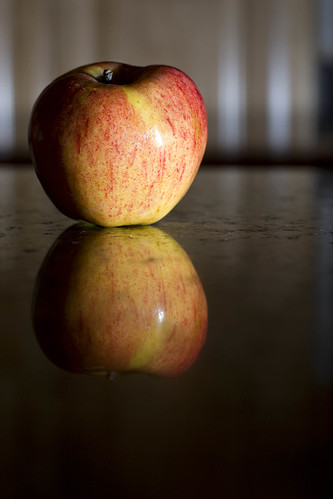
Strobist info: M 1/64 ~1.5ft away
I tried to make background black, but don't know how. If the light is closer than that, the background is darker as in Strobist distance exercise, but it's too flashy and harsh. Am I missing something? How do people take totally black background with flash focus only on the subject without getting to 1ft and being too harsh?
Need to learn how to get black background. Snoob?
Self-portrait with BBF

Self-portrait is so fun. I used a remote control with back-button focusing, mainly to see if I can back-button focus and use self timer.
f/stop is not too low. I used an object an arm length and focus on that object, remembering the reference plane. Then I have to very carefully line my face with that plane to get my face in focus.
My fav shot after a few trials. See my left eye, I can even see the veins! Love the focus. I think I can do BBF with timer . yayy. I've never gotten this nice focus with AF w/ shutter focusing. I feel like I master BBF now. Finally I'm confortable with BBF.
Tuesday, January 25, 2011
Light painting
 Light painting is so fun. I ended up drawing many things in the cold during dark night. Hardest part is focus and to see how big to draw. Most of my pics have very small letters and I needed to draw bigger.
 Focus focus focus. Many pics before were out of focus so light traces are
not sharp. How to do? Point the torch light with light on before clicking the remote control to start the shutter release. That way, it will focus on the torch light and it will track. I have to change the focus to normal AF (option 0) in Custom Functions IV so that it will autofucus. I can't pre-focus without anything in there. AF0 works perfect in this case.

Dont repeat too many rounds. It'll suffer from blurry lines. Just draw 2 rounds to get clean lines. Big torch light is already a big light brush, so one stroke is thick enough. The light in the center will define the sharp lines (if in focus) and the surrounding light will light-shadow that sharp center line.
I got YMT's name in one shot because hers is long, so I ended up doing one stroke to finish. Turned out it's the best. Just one big stroke.
Monday, January 24, 2011
Popping pics
 Earth tones for this Spring season in the mall inspired me. I'm crazy about muted tones.
I have new found love for natural light during the day. Isn't it pretty? I don't have to do much with lighting.
Actions
-Boost by PW
- Masked everything else except flower to boost flower only
- Define and Sharpen by PW
- Masked everything else except flower to extra-sharpen flower only
(Note: Boost aldy has sharpen inside, but I did sharpen again because I'm crazy abt sharpness and popping now)
I'm finally happy with making the pic pop. I have to selective sharpen the image so that the sharp areas seem popping.
And what a difference I see now in sharpness. Now I know people sharpen their pics in editing to make it more focus and more pop. I gotta keep working on my editing skills and I can get there.
Day_20_RubikCube_actions
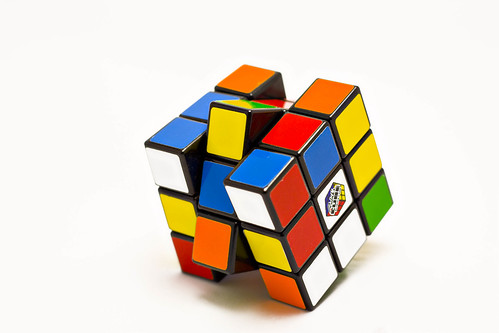
Built my light tent finally!
Wanna try to do individual color pop, so I picked something that has all colors.
Turned out simply Increasing the saturation turned out better than all other actions I played on color pop or boost.
I like my seamless background, but it gets boring after I took some "product-looking" shoots.
Backdrop is more greyish, so I did color replace by this instructions:
www.thecoffeeshopblog.com/2011/01/coffeeshop-backdrop-fix...
I did it manually following her instructions rather than actions cos it's simple enough.

Sunday, January 23, 2011
Photoshop day
 Spent whole day at home on photoshop. I already forgot simple things I've learned before.
Collage
I had to spend ~2 hrs to do a collage. And I still wasn't quite happy cos it's not exactly how I want, like cropping each image in big collage crops the whole thing instead. So I gotta figure out how to crop the layers or marquee select and cut and paste in a new layer? but it's too late and gotta sleep.
CoffeeShop has lots of free storyboard actions here.
http://www.thecoffeeshopblog.com/2010/10/coffeeshop-group-it-action.html
I don't think it's that easy to use if I just want a simple collage. Or maybe I just need to look carefully into her instructions.
I don't think it's that easy to use if I just want a simple collage. Or maybe I just need to look carefully into her instructions.
Resize
Edit -> Free Transform -> shift+drag to resize with fixed aspect ratios.
Fav actions
PW's boost sharpens and brighten the colors.
CoffeeShop's color pop ?
Sharpen is good by either PW or MCP, but Boost aldy has sharpen ; same as most other actions.
After getting apple laptop from Google, it's my main computer now. It's very hard to go to Windows and work on 2 computers and keep transferring files back and forth. It's ridiculous. Plus, my Dell 710m laptop is so old with 520MB RAM that Photoshop CS4 is overloading it. I have to literally wait ~3 min after any click in CS4. It's wasting my time. I tried Gimp, not bad but no actions in Gimp as in Photoshop. So I can't abandon Photoshop, especially for fun actions like vintage or boost etc.
I even want to buy a Photoshop myself and put it on Mac.
For the first raw green beans, used Boost action and that did it. Beans look brighter, greener, and sharper. Nothing else needed.
Thursday, January 20, 2011
Color Popping
several color popping methods such as channel mixers, blending modes, lab color, the sponge tool, hue/saturation adjustments, and so much more!
1)
MCP Actions
See "How to make white wedding dress to be white". Second method is how I can selective pop individual colors.
2)
Similar technique: Popping blue, yellow, green and red separately, but above mcp method seem better because we can add lightness.
Flickr
3) Tutorial 3 with free action
Coffeeshopblog
4)
Free actions
Free actions
Inspiration
I just tripped on this blog while searching for back-button focusing tutorials and I was hooked for the whole day.
Her blog is just so cute . Pics are so cute that I could die from cuteness. I read almost all of her posts (or at least uncountable number of posts) the whole day. I just couldn't stop. Love her colors that really pop and clarity, and I really want to know how she post process them. So I keep searching on her blog for tips and tutorials , but seems like she hasn't posted anything abt post processing except that she used Totally Rad Actions mostly.
Her editing results are similar to Jodi Friedman's popped colors, contrast and composition, but Ashley's contents are cuter.
I'm so inspired by her pics that I want to take pics now in daylight and post-process. I gotta learn more post-processing now.
She said she adjusted the curves, increasing the contrast, web sharpening and color. I gotta learn how to saturate the colors separately and sharpening.
One thing I got reminded from her pics: I gotta drop down low and angles angles angles!!
Dropping low and shotting up is one of the angles I've been forgetting. Shoot from floor level or include some floor/table content to give that composition a pop.
Sunday, January 16, 2011
The keys
We got the keys to the house today. We are supposed to get it tomorrow, but Bruce gave us early after the seller-buyer tour.
Friday, January 14, 2011
Back-button focus
I learned something and tried it out today. It's back button focus. I've tried a few shots of Un and stuff around the house. The fun part is we can lock AF by * button based on an AF point
How to setup
----------
Its in custom functions IV – operation/Others.
Then it’s the first screen that says – shutter button/AF-ON button. (page 181 in manual)
How to setup
----------
Its in custom functions IV – operation/Others.
Then it’s the first screen that says – shutter button/AF-ON button. (page 181 in manual)
Thursday, January 6, 2011
Wednesday, January 5, 2011
Tuesday, January 4, 2011
Day4: Big check
This is the biggest check of my life so far. It's kinda scary and mixed feelings at the bank writing this cashier check, and knowing that all those money are gone. I feel definitely sad to see all those money gone.
Monday, January 3, 2011
Saturday, January 1, 2011
Project365 started!
I've decided to start Project365 this new year. I've been planning to do that for like a year, and never did it. Now it is. I want to improve. I will commit. I have a good start. I'm taking lots of pics at Carmel trip with Un.
Subscribe to:
Posts (Atom)